Thursday, May 14, 2015

Giveaway Winner Announced!


Hi, all!  I meant to announce the canvaspop winner yesterday, but we've had a crazy week - getting back from a whirlwind visit to Michigan and taking pip to his first ER visit (you knew it was bound to happen...) SO.  I'm a little late.


First off, thanks for entering the giveaway!  Our winner, chosen at random by rafflecopter is:

a Rafflecopter giveaway

Jesslyn W.!  Yea!  So happy for you.  You will receive an email shortly with details.


If you didn't win, use this code (which is good through July) for a 35% discount!
BUGABOO35


I appreciate all of my readers - thanks for sticking around!  There're are a lot of projects and ideas I want to share with you that I haven't gotten to with my copious amounts of break taking lately, so stay tuned!


Tuesday, May 5, 2015

canvaspop Review! And giveaway! Woo-hoo!


This is the best post ever.

Not to toot my horn.  Actually, this post has very minimal parts me and many more parts something SPECTACULAR - so I'm not really tooting my own horn.

Really I'm tooting canvaspop's horn.  

Have you been to CanvasPop before?  I admit it, I had not.  I'd often thought of getting a photo printed on canvas, but the prices scared me.  And I didn't know where to go, there are so many options out there.  And what if I spent all that money and hated it?  The unknowns were just too much.

So I'm going to help you out: go to canvas pop.  And not just because I've got a nice little discount code for you (which you can find at the bottom of this post, you're welcome).  Let me tell you a little somethin' somethin' about canvaspop.


You can do so much!  Honestly.  It's crazy.  So, first of all, you can upload a photo from your computer OR straight from instagram or Facebook.  It doesn't matter the size or resolution, they work with nearly anything and they'll let you know if it's not going to work out.  Then, there's the customization.  You can order canvas prints with or without text, collages, mosaics, triptych canvas's... the possibilities are pretty much up to you and your creative mind.  You can add shapes as well as text.  Or filters!  And they've also got different border options.  You can choose to have it printed on paper or canvas and have it framed or unframed.  Nextly, they've got deals going on often, which is super nice if you're afraid of a canvas price tag as I used to be.  They've also got an option to chat live with a rep if you need customer service - which I didn't - but if you do, how easy is that?!  Oh, also, they have a 100% "love it" guarantee.  


I'd also like to point out how user-friendly their site is.  They walk you through all the steps so you can create exactly what you want.  Everything's laid out perfectly, with no guess work.

And by now you're like, so what?  Show us the money!!  So I will.  Remember the other day when I shared my foray into taking my own family photos (which I will never do again)?  I alluded to being on a deadline for getting them done and this is why.  I really wanted an updated photo where Pip isn't a tiny newborn.  So I weeded through all the outtakes, got the mr's opinion and chose this guy:


And I got this awesome 16x20 canvas:

And it's pretty much perfect.

I was so excited to open it up when it arrived... here it is all specially bubble wrapped.


One awesome thing I wasn't aware of is that the canvas's all come ready to hang.  Did you know you're not technically supposed to hang a canvas from the actual canvas frame?  Yeah, I did not.  Fortunately they had this totally official hanging hardware already on there


AND they included a nail/hanger thingy.  So I didn't have to go get anything - except my hammer and that was just in the garage.  Woo hoo!


They also have these soft rubbery circles on the corners of the canvas to protect your wall.  Or the canvas.  Or... huh... well, they're cool.


And look at how nicely these corners are wrapped.  I've tried those DIY wrapped canvas's.  They don't look like this.  (At least mine don't).


I opted for the photo wrapped edges, but you could get black or white if you prefer.


Then I just hammered the hardware into the Giant Green Wall, and voila!


Here is my awesome family canvas above my piano.  (admittedly, it probably won't stay there, since we have big plans for the Giant Green Wall - teaser, teaser! Project coming! - but it will get a place of honor, for sure.)  


So.  Now that you've seen how great canvaspop is, you want a canvas, don't you?  I don't blame you.  I'm already planning black and white canvas's of the kids for our upstairs hall.

Guess what.  GIVEAWAY!!  Yea!  You can win a 16x20 canvas from canvaspop!  You really can!  Enter below!


So, here's the deal:  The giveaway runs for a week, to give you plenty of time to enter.  It opens RIGHT NOW (May 5 2015) and closes next Tuesday (May 12 2015).  Enter using as many of the options as you want, one entry per option.  You must live in the US or Canada to win.  I will announce and email the winner on Wednesday May 13th, 2015.  The winner will receive one 16x20 canvas with a 0.75 inch frame and free shipping.

a Rafflecopter giveaway

And for those who just can't wait to hear if you've won or not, use this code and get 35% off!  It's good until July 30th.  Go on!  Go do it!  (this can't be combined with any other discounts and is only available to orders shipped in the US and Canada)
BUGABOO35


You can find canvaspop on Facebook, instagram, pinterest and twitter


**Yes, you are correct.  I DID receive the 16x20 canvas from canvaspop in exchange for doing a review.  BUT all of the opinions expressed above are mine, mine, mine.  Yep, for real.  Mine alone.  I really do like canvaspop that much.  It's true.**

PS.  And since we sort of missed my blog's birthday in late February, we'll just consider THIS the party, mmmkay? 


Wednesday, April 29, 2015

It's Spring! Here's some Flower Bookmarks!


It's Spring!  It's Spring!  It's finally here!  Though I thought that a few weeks ago and then it snowed, so I may be wrong.  But it sure feels like Spring!  It's sunny.  I've gone out without a winter coat.  The grass is actually more green than brown.  The trees are starting to bud with "baby leaves" as mini calls them.  The kids are riding their bikes.  AND I'm officially done paying attention to my child's homework, signing papers, initialing agendas and packing lunches.  And by officially done I mean mentally done, because school does not actually end until May, but let me tell you I AM DONE.

So.  It's Spring.  And in honor of Spring, here are some Spring-inspired bookmarks for you to make - and they're so easy!

You need: 
big-ish paperclips - any kind, really.  I used green so they'd represent the stem of the flower, but you can use any color.  They are the big kind, but not giant. (I got them at the dollar store)
fabric yo-yo's
buttons, needle and thread
White (or light colored) felt
Scissors
E6000
Clothespin

You can get fabric yo-yo's pre-made at fabric and craft stores - check in the notions or by the scrapbook embellishments.  BUT, although you CAN go this route, I highly recommend making your own!  Why?  Because you can use up all your scraps!  Plus you can personalize your yo-yo's and use your favorite fabric.  AND they are easy and super fun to make.  Seriously.  Sometimes I sit in front of the TV at night and just make a bunch of yo-yo's to be used at future times for various projects.  Does that make me weird?  Probably.  If you'd like to know how to make a fabric yo-yo, (and trust me, they are SO easy) check out this tutorial.

So.  You've got your yo-yo's.  Now find some coordinating buttons and use a needle and thread to sew them to the front (AKA gathered portion) of the yo-yo.  It's ok if you go all the way through as no one will see the back.

Now, cut out a felt circle, just smaller than your yo-yo flower.

Put some E6000 (not too much) on the back of your flower, and a little on the front of your felt circle.  Place the flower on the top of the paperclip (the end that is only a single wire layer, not the end the separates with the two layers of wires) and press the felt circle to the back of the flower - sandwiching the paperclip between.

Use a clothespin to clamp the flower and felt circle together until the adhesive dries.

Unclamp, and voila!  Adorable little flower bookmark!

These guys come together really quickly and are so adorable, they make awesome gifts for the avid readers you know!  How about an end of the year teacher gift??  

Make a whole set and package them up on a cute card.

You can also use this exact same method with covered buttons instead of yo-yo's, and they're pretty darn cute as well!


*Be sure to check below for all the fun parties I link to!*

Wednesday, April 22, 2015

The One Where I Pretend To Be A Painter


My sister is an artist.  She teaches high school art classes (including basics, history, ceramics, photography, stop motion, etc.) and has a part-time photography business.  So, pretty much she's amazing. (not just because of these talents, but we'll leave it at that for this post...)
This year, she had a milestone type of birthday (but for her sake I'm not going to mention the age... you're welcome Alisa!)  But I knew I had to do something big.  Something spectacular.  Something very secret and hush hush.  So I worked with my brother in law to throw her a surprise party with all her friends and family.  I decided to go with an art theme (for obvious reasons, see) and I have to say, I think it turned out pretty awesome.  I mean, not to toot my own horn or anything...


Anyway, for her gift (which also doubled as decor for the entry to the party) I decided to put this perfect quote on a canvas for her.  I know you've seen it around, because like I said, it's perfect, so a lot of people obviously love it.  But I'm going to explain my painting technique (which was freehand) and how I got a sort of 3-D effect for the flower.

I was planning on using my cricut explore to cut out the vinyl letters (because that's what it's for, yo!) but sadly my computer is having major problems lately - we blame old age, it's really got one foot in the grave (sorry, old friend, but it's true) - and it won't run the circuit design space software properly.  Or at all.  Gr.

So here's where I started out.  I sketched my idea on normal paper, figured out the spacing, etc, and the fonts I wanted to use.
Then I used a ruler and pencil and lightly drew straight lines across the side of the canvas so I would stick my words down straight.

The next step was to measure out the vinyl to the height I wanted the words to be.  I drew the words on with pencil just eyeballing everything.  And then.  The best part.  I cut every letter out by hand with a scissors.  No I am not kidding you.  Yes I am serious.  And yes, it did take a while.  They ended up nice and straight and I was pretty happy with it.  So I placed it on the canvas.

 I rubbed pretty hard on the letters because I didn't want them to come up and I was a little concerned about bleeding underneath.

 Then, on to the flower.  I wanted to make it have texture and depth, but I am NOT an artist and I'm pretty unsure of myself when it comes to oils.  So I knew I'd be painting with acrylics.  I drew the flower on the canvas lightly with pencil, then went over it with a hot glue gun.  


 I did multiple long lines for the stem, a single layer line for the leaves, layers of curves for the petals and dots for the middle.

To paint it, I did the background first.  I started in the top left corner with black, then without rinsing my brush added violet.  I blended the two together, slowly adding more violet and then, without rinsing the brush again, added indigo.  I blended the violet and indigo, then rinsed the brush and added in the aqua, blending the indigo and aqua, and moving down with just the aqua.  Then I added some citron green and blended that into the aqua really well, moving down to just citron in the corner.  Basically, you rinse your brush only between the dark to light colors, other wise you leave it and just add more color to it.  I went right over the letters, but avoided the hot glue flower.
I used dark green, kelly green and citron on the stem and leaf, just blending and highlighting.  Then I used a cherry red in the middle of the flowers, blended it into a dark pink and blended that into the white at the tips.  In the dotted center I used yellow, mustard and white to highlight.  I just dabbed it on with a round brush.

 And that was that.  When I took the letters off (which I did while the paint was a little bit wet) I did discover a bit of bleeding.  I took care of it with a white oil based paint pen.  I just went over the worst parts to even them out.  

She loved it.  I think it was a pretty fitting tribute to her _ _  years of life!  


*Be sure to check below for all the fun parties I link to!*

Monday, April 20, 2015

Why I Will Never Be Taking My Own Family Photos EVER Again. Ever.


The other day I forced my family out to a derelict brick shed next to some train tracks so we could take family photos.  There was a reason - I don't submit to torture willingly or any more often than absolutely necessary, I mean, I'm not WEIRD.  (I am a little weird.)
But, honestly, with this family you'd think I told them we were all going to a group rate on root canals with a little paper cut and lemon juice thrown in.

Apparently family photos aren't really fun?  Or something? 


I happen to be just a little OCD when it comes to certain things.  Like making my yarn pom poms completely even all the way around, or lining our sheets up completely straight on the bed before we fall asleep or closing all the open doors when I'm in a room.  And photos.  I'm a firm believer that all things should "go" together when taking photos.  I mean the clothes, the props, the background... not MATCH.  I do NOT like matchy matchy when it comes to family pictures especially - I like coordinating colors and patterns, balance, and a combination of styles that creates a cohesive themed look.  Or something like that.

All of that explanation to let you know that I was a little... uh, what's the word?... anxious stressed CRAZED the evening we took these.  I needed the right clothes for everyone, the right props, the right camera stuff, an extra battery, etc, etc, etc.  So Pip didn't get a nap.  Bug was completely against the whole idea. Mini was only in it for the promised ice cream at the end, mr had to be somewhere else in an hour...

So, basically, the PERFECT time for me to be taking our own family photos.  Can I just lay something out here right now?  There IS no perfect time for me to be taking our own family photos.  Maybe someone out there can do it.  But this lady?  No.  Nope.  Uh-uh.  And I'll probably try like 5 more times anyway before I give up.


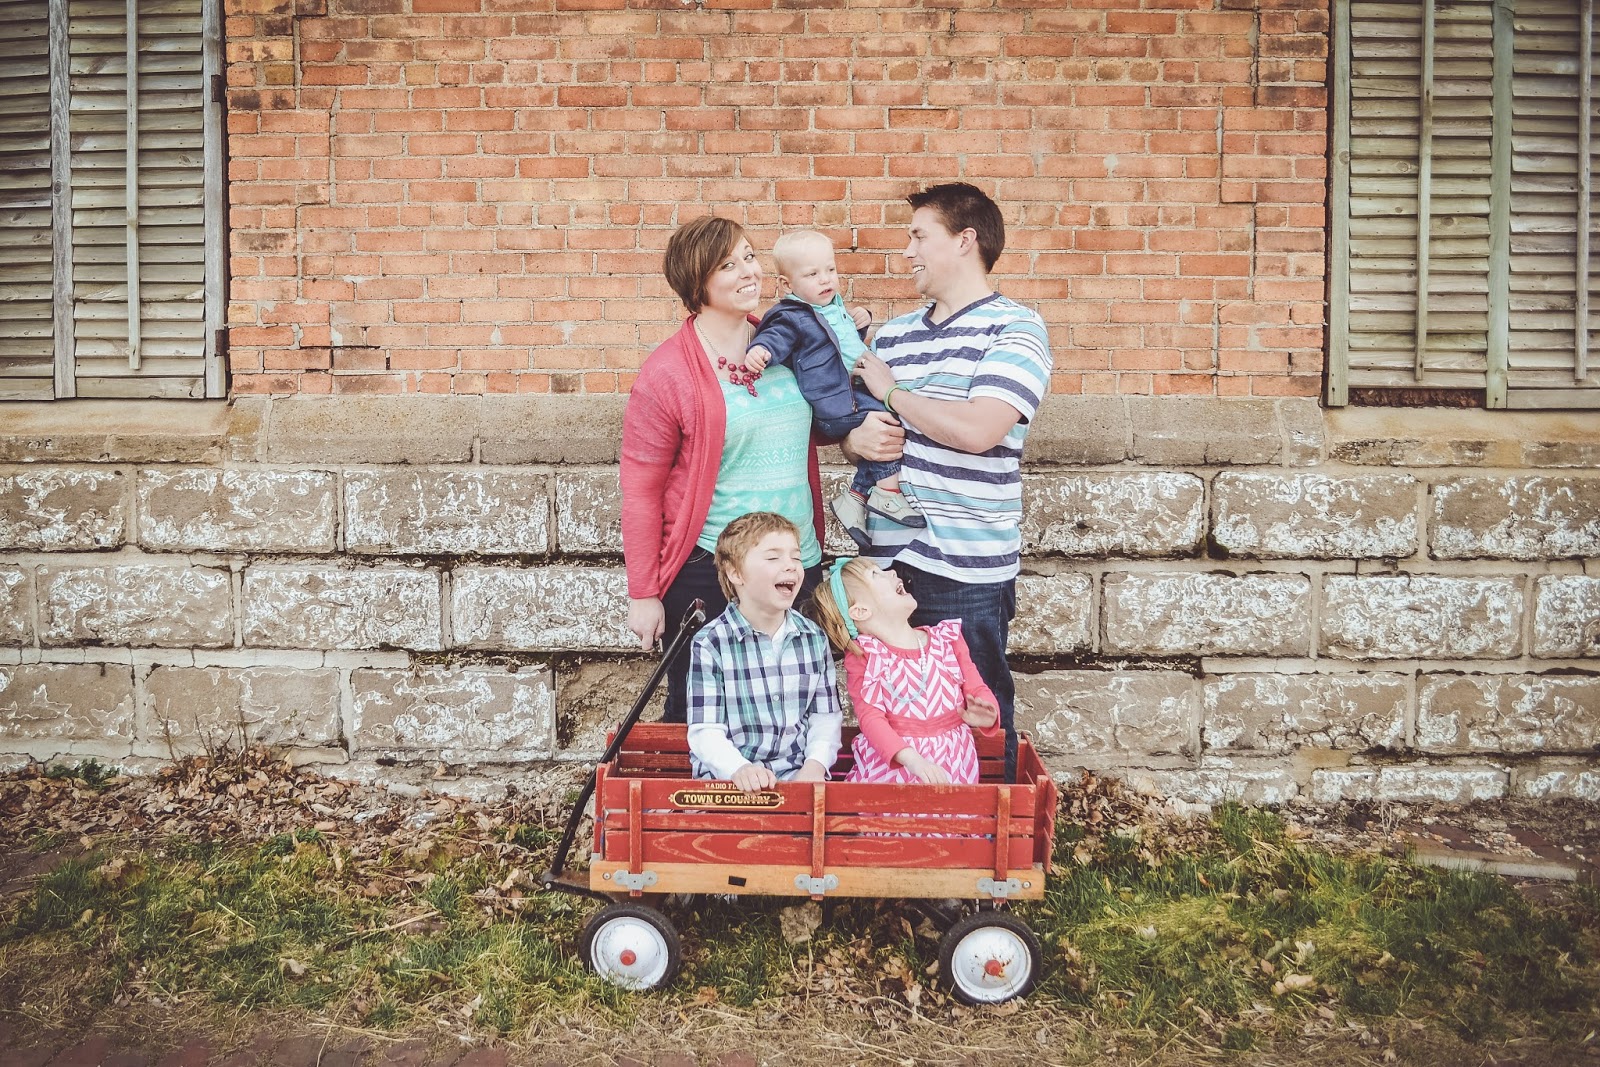
This is not my favorite.  But it IS the ONLY one where we are all looking at the camera with somewhat normal looks upon our faces.  Did you hear that?  The ONLY ONE.  Out of - wait for it - 300.  300 photos I took with my super awesome camera I love and the remote I got myself and we got ONE PHOTO where we are all basically on the same page.  

I blame myself entirely.  I should have put it off until the baby had slept.  And ate.  And was in a happier mood.  But I was "on a deadline" with these, so we went.


After sorting through 300 photos and deleting most of them, I narrowed them down to the ones worth editing.  And the ones you see here are the best of the bunch.  Never mind that Zoe is literally voguing in every. single. one.


This one's the mr's favorite.  It's definitely one of the cuter ones - we seem all carefree don't we?  Too bad Pip's glaring and squirming while the rest of us appear to be having fun...

And call me crazy, but this one is my favorite.  It's just silly.  And Ax has something sort of resembling a silly face, near smile, so I like that.

I'm not sure if this is too "gap advertisement" or not.  I just can't decide.

Also, Ax is obviously making a gagging motion, implying that these family photos are THE WORST.

But I didn't let the sun blinding us (causing all the squinting and mooshed up faces) or the bad attitudes or the screaming baby stop me!  No siree!  I insisted on attempting a few solo shots of the kids...

 in which the baby played with junk,

 became completely traumatized and forever afraid of wagons, 

 finally sort of smiled, due to the presence of a ball - his favorite thing -

 and eventually took off down the tracks.

 See ya.

Not to be outdone, this kid

 refused to smile normally.

 Because nothing I could say was goofy enough.

 But this look is much more naturally him anyway.


 I'd like to add that the wagon was a thrift store treasure I picked up THAT DAY for only $10.  We've never owned a wagon...
I briefly toyed with the idea of spray painting it a fun, bright modern color...
and then snapped to my senses.  Cover up all that vintage charm??  What was the point of buying an old wagon then??  I think I made the right decision.

Zoe thought she was on stage or something.  She quickly channeled her inner diva and started popping out poses I had nothing to do with.

And even though this isn't a true smile, I love her crazy wild hair in this one.


And I caught her true smile here anyway.

She may ham it up, but she can't take a bad photo to save her life.


 I couldn't for the life of me get a photo of them all together smiling, looking at the camera, or being photogenic at all, so I just snapped a couple as they walked.

Which are cute and true to life, so I love that aspect.

 And all of those?  Are the awesome ones.  You want to see the outtakes?  Trust me, you do.  For real.

 So.  Justin's in pain, Zoe looks insane, Ezra can't even open his eyes, and Axel is screaming his head off.  Super.

 So, maybe some kisses will help?  And Zoe is adorable.  Adorable.  Too bad the rest of us are less than stellar.

Nope.  Kisses didn't help.  Setting him down maybe?

 How about some silly faces??  Wait.  I think it worked.  He's not screaming!

 This one is ALMOST good.  Almost.  Except for a certain 7 yr old and his crazy face.

 And we were so close!  So close!  I love this one!  If only... I know a certain 18 month old who was determined to ruin every photo.

 I can't tell you how much I love Zoe's face.  Justin hates this photo though.  
You know what the problem is with taking these photos yourself?  When you're in front of the camera, you can't see any of those little quirky things you'd correct if you were looking through the viewfinder.  You know, the "put your chin down, stand still, don't be silly, look up, put her hands down, smile, don't smile", things.

 This idea is very cute.  In theory.  Except Axel hates wagons.  This is literally the only photo in which he isn't frantically trying to climb out of the wagon while yelling in terror at the top of his lungs.

 All in all, it wasn't the positive experience I'd hoped it would be.  We did get some cute photos I'm hoping to hang in a gallery type style.  And they are more real than perfectly posed and smiling children.  I'd rather have these silly, crazy, full of personality cheeky little hooligans.  

Still.  Next time I will for sure be asking someone else to push the button. 


Adios.


*Be sure to check below for all the fun parties I link to!*
Related Posts Plugin for WordPress, Blogger...