Thursday, November 29, 2012

Debonair Dress-ups


This post original posted on Envirocraftiness as part of her "Movember" series of guest posts.  Go check out her awesome blog - lots of fun recycling/upcycling, frugal ideas!
***

In honor of Movember I've decided to share some simple felt stache dress-ups I've enjoyed making for my kids in the past.


You've no doubt seen many versions of faux facial hair, especially with the increasing trendiness of mustaches in the past year or so.  Here's what I like about these cuties:
1. Felt.  Soft.  Cheap.  No fray, so it's super easy to sew.  Pretty durable.
2. Double sided.  There's no front and back, so the kids don't have to worry about "getting it wrong" AND that simple feature can provide lots of variations!
3. Elastic ear loops, instead of one that goes around the back of the head.  We learned that it was fairly difficult for the kids to get the mustaches in the right spot behind their heads, and even MORE difficult to get the elastic to stay put and not slide down their little heads.  We solved the problem and still made sure different sized heads could wear each stache by using two ear loops!
Alright, enough talk.  Let's get down to business.  
You'll need:
felt in your choice of colors (think outside the box!  It's fun!)
skinny elastic OR elastic thread
a sewing machine
mustache templates
a sharpie
scissors


 1. Find some mustache templates.  I realized that plain old printable mustache shapes that you can resize as needed are actually kind of hard to find.  Unless you want to pay for them from etsy.  So I made it easy on you and drew up my own on my computer.  You can find them on my blog.  Once you find ones you like, print them on card stock.
2. Cut them out.
3. Lay them down on a piece of felt.  Trace around the template with a sharpie.
4. You will need two pieces for each mustache.
5. Cut around the tracing.  You will cut on the inside of the marker line, so keep that in mind when you are sizing your templates.
6. Measure from the corner of the mouth to the back of the ear.  Double this length and cut two pieces of elastic the total amount.
7. Lay your mustache pieces together.
8. Fold your elastic pieces in half.


 9. With your elastic still folded in half, sandwich the cut ends in between the two mustache pieces.  Do this on both sides of the mustache, with the elastic pieces directly out or angles just slightly up.  Pin the elastic in place.  You can also pin the mustache pieces together if you are worried about them slipping.
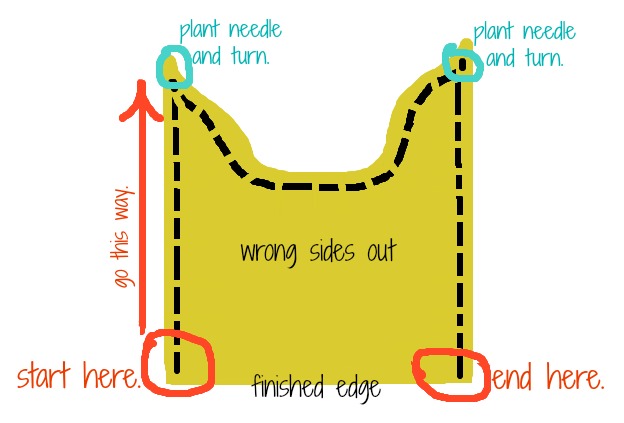
10. Sew around the whole mustache with matching thread.
11. Begin sewing at the top of the mustache in the middle.  Make sure to backstitch.  Use a straight stitch and sew around the edge, it doesn't have to be perfect.
12. When you come to the elastic pieces, make sure to backstitch a few times over the elastic to really make sure it is sewn in place and won't pull out when stretched.


One easy and cute, soft and durable debonair little mustache!  

But wait!  There's more!  Remember how I said there were a lot of variations to this simple mustache?  One obvious variation is simply making different shapes and sizes of mustaches, but you can also make a beard!  In honor of the upcoming holiday season I, of course, had to create a Santa version.

I made this beard just as I made the mustaches - two pieces sandwiched together with the elastic loops inside.  I cut the mouth section out before sewing any of it.  Then I sewed around the outside and used a zigzag stitch around the mouth.
Here, I actually used elastic thread instead of elastic.  If you opt for elastic thread, keep in mind that it is incredibly stretchy so you will likely need about HALF the length you'd need in regular elastic.  You'll also want to backstitch over it many times to secure it and make sure your stitch length is set very low, or it will simply pull out.


And HERE is where it gets really fun.  It's probably my favorite variation to date:

Why is it a mullet stache?  Well, folks, like its namesake, this mustache is all about business in the front and party in the back!

A nice, normal, neutral color of felt for the front of the mustache.  And just in case you need a little fun, some pep or pizazz if you will, a bright, fun color for the back.  Just to keep them guessing.


For the walrus stache above, I also freehand sewed (freesewed?) some dark brown bristly hairs, for a bit of added detail.  I'll probably do this more often since I've decided I kind of love the look.

And just a note, between elastic or elastic thread - the elastic is easier to sew in place and make secure, but we have found that the elastic thread really does work better for tiny ears.  The elastic pieces - even when you used the extra skinny elastic - are sometimes a bit too bulky behind the ear for little kids.  Perfect for adults though!

Of course, you could make these for photobooth props or the like, but we like to use them for our dress up box or Halloween costumes (we used them for Mario and Luigi costumes last year).  This year, I made a bushy cowboy stache, a Captain Blackbeard beard, a walrus, and a biker dude. 

If you make a matching felt pirate hook (which you can find here), like the one seen in that photo of Captain Blackbeard, you'd have a pretty spiffy Christmas present for the little ones!


Wednesday, November 28, 2012

A Quick and Easy Hat How-To


This post was originally published over on Christina's Adventures a few weeks ago.  If you don't follow her already, go check her out!  Love her home decor and frugal ideas.

***

Today I'm going to share a really easy, inexpensive idea perfect to help with the cool fall weather we've been having!


You won't believe how easy it is to turn a t-shirt:


And save a BUNCH of the t-shirt for later projects too!  In fact, all you need are the sleeves!

 1. Chop off your sleeves.  You don't need to be too precise, but give yourself some length to work with.


 2. Lay out a hat that fits well (opening to bottom of sleeve) and mark about two inches ABOVE it.


3. Cut both sleeves across where you marked your measurement.
4. Cut the seams off both sleeves.
5.  Now you've got two rectangles with one finished edge each and no seams.  Open them up and lay them with right sides together.
6. Fold them in half together.
7. About two inches down from the top, cut in from the fold.
8. Continue cutting across, angling up at a curve toward the outer corner.
9. When you open it up, your two rectangles will look a little like batman.


 10. Pin along the sides and across the top, leaving the finished edges along the bottom open.
11. Sew up one side.  When you reach the first point, plant your needle, lift your foot, and turn your hat.  Set your foot again and sew along the top curve.  When you reach the second point, plant your needle once again, lift your foot, turn your hat, set your foot and continue to sew down the final side.  
When you sew, make sure you back sew at the beginning and at the end.
Here's a poorly drawn diagram that may help:
 Or it may not.  I don't know.  Use what works!


13. Once you're done sewing, trim the excess seam allowance off.
14. Turn it right side out.  You can iron it now if you'd like.
15. Tie a single knot in each of the pointy parts.

Was that easy, or what?!?  I told you!  I love the stretchy-ness of this hat.  It's also nice and soft, since the t-shirt was already "broken in".  The lightweight fabric is perfect for this time of year, at least around here where it's kind of chilly, but not super cold yet.  

 It's so easy, it's addictive.  You'll probably want to use all of your old shrunken or stained t-shirts.  Don't worry, you can do variations!

For this red one I cut only one long point up the middle instead of two smaller points on the sides.  Then I sewed it and knotted it the same way.  I added the button placket from the front of the short sewn at an angle on the side of the hat for a little detail.  I kind of love the fact that she looks like a garden gnome.

This green one is really fun.  I cut it out much like the first hat, then I made two pom poms out of the gray and white striped t-shirt.  I tied them onto longer pieces of the t-shirt, then stuck them in between the two hat pieces when I placed them right sides together.  When I sewed around the hat, I made sure to sew through the long strings that had the pom poms on the other end.

I may have, perhaps, gone just a tiny bit crazy.  In addition to the 8 I made my own children, I possibly made 6 more to add to a baby shower gift.


I'm not sure if that's resourceful, or just sad that I have that many old shirts hoarded.  Huh.

In any case, have fun making some cute, one of a kind hats this fall!  When you're not doing that, come check out my facebook page, pinterest boards, or instagram!

Tuesday, November 27, 2012

Randoms.


Although I posted through Thanksgiving, I've actually been "off-grid" for about a week.  And it's super hard to get back into the swing of things!  Especially since this time of year is - as you well know - the busiest time of year.

Hope you had an awesome Thanksgiving!  We had a little of this:
and this:
and this, yum!
and this:

And, of course, a lot of family - all of whom I managed to forget to take pictures of.  There were 6 different desserts, people... surely you understand my distraction?
We also did our part for consumerism and left my house at 3:55 AM on Friday morning.  Unfortunately, you may be aware that this year black Friday became black Thursday, so stores were pretty bare, but we had fun anyway.

And, amazingly, we got our tree up!  Our Christmas decorations aren't completely up, but we're ahead of the game!

Now.  NOW.  I have to kick myself back into high gear, people.  I've got a table to decorate for our church Christmas party (so I've got to make some kind of tablescape.  Which I don't really do), a golden birthday coming up (not mine), and a trip to plan, and billions of presents to make, and then Christmas.  Oh, and then another birthday party and then a New Years party since we're missing the Wisconsin family Christmas this year.  Phew!

I know, I know.  Your to-do list looks like mine - or worse.  I know!  I'm just letting you know I'm right there with you.  So I'll be a little more sporadic than usual.  (But that always happens this time of year.)  I'll try to make it up to you after December when I've got too many projects to make sense of.  

In the mean time, I accomplished one Christmas gift - this Peg People Color Match game:

and I sent out the invites for this little girl's party:

(And NO the Dora theme was NOT my idea.) (Just so there's no confusion, she's turning 3 on the 3rd.  We're just having the party on the 7th.  It's still a golden birthday...)

Also, this week you'll see some guest posts I did a while back.  Woo-hoo!  

Alright.  Glad we're all still here.  Later!


*Be sure to check the right sidebar for all the fun parties I link to!

Thursday, November 22, 2012

Happy Thanksgiving.


Now eat yourself silly.


*Be sure to check the right sidebar for all the fun parties I link to!

Wednesday, November 21, 2012

picmonkey to the rescue.


If you follow me on facebook, you know that picmonkey and I have a love-hate relationship.  I don't know if it's the site, my browser, my computer, or all three, but holy cow do I have issues sometimes.
But I keep going back.  Know why?  Everything else just doesn't compare.  (Although I do sometimes get really mad and picmonkey and I "take a break" and I hook up with ipiccy until we work it out.)
Last night, however, the stars aligned, or something, and I had fun with picmonkey - no swearing at my computer or anything.  Now you can use any of these free printables to dress up your Thanksgiving tablescape, food counter, buffet, side table, or what have you.  All photos courtesy of me, and are protected under my copyright.  Not to be all grumpy or anything.  But you know, personal use only and all that jazz.


and one of my favorite quotes:


Did I mention that one of my favorite holidays is coming up??  What?  Thanksgiving?  Oh... no.  Black Friday!  Make it a memorable one!


*Be sure to check the right sidebar for all the fun parties I link to!

Tuesday, November 20, 2012

Alligator for Thanksgiving.


Alright, here's the deal.  This is a tutorial in two parts.  It still qualifies as easy.  BUT, the first part of the tutorial can be just a tiny but time consuming.  Let me 'splain.  No, there is too much.  Let me sum up.
Last year, you may remember that I printed the word "thanks" in many languages onto book pages.  I then traced around different leaf shapes and hand cut out a bazillion leaves to be used in numerous different ways.  Garlands, for instance.  And a wreath.  SO.  If you follow my leaf tutorial, it might take you more than 5 minutes to whip this out.  However, you will only be making a few leaves to go on a few sticks, so that will significantly cut down on the time.  You know what else would cut down on the time?  A silhouette.  Just saying.


So, let us first talk about the thanks on sticks.  
You will need:
Book page leaves in different shapes with "thanks" printed in different languages and colors and fonts
Hot glue gun/glue
Skinny sticks
gold spray paint
cotton twine
small hole punch
large vase/jar thing

Firstly, I spray painted my sticks gold.  You can totally not tell in this picture, but it's the best I've got.

 Then, I punched a small hole in each leaf.  My initial intent was to tie the leaves to the branches.  However, this proved to be more time consuming than I wanted and was kind of frustrating.  SO.  String your cotton twine through the hole and tie it in either a knot or bow.  I did some of both.
Then, put a dab of hot glue on the back of each leaf and press it to the stick wherever you want it.  I made it random and sporadic.
All that's left to do is put them in a vase!

 So, let's talk about this vase for a minute.

This vase was one of my first purchases for the current house we live in.  I bought it at a thrift store for cheap.  It was shiny black glass.  And directly after I bought it, I hated it.  Fast forward then (which is actually rewind from now) to last Thanksgiving.
I decided to spray paint it brown.

This is not plain brown.  You could tell, couldn't you?  I primed it first with Krylon in white.  When I started spraying it brown, I noticed that though it was smooth in most areas, there were some spots that crinkled up and were rough.  At first I was totally ticked off, since there really wasn't a good way to get rid of the wrinkly areas... then I realized it looked a little like faux alligator skin.  And I'm super weird in that I really like the look of faux alligator skin (says my two alligator skin purses and one alligator skin clutch and one alligator skin wallet...)  So, I tried my darndest to duplicate my mistake.  And, surprisingly, it worked out fairly well.

Basically, I just overloaded small areas with spray paint (so the coat was much too thick) (but not so thick it just ran down in drips everywhere) AND held the can too close to the vase while I sprayed.  So if you ever wondered what would happen if you ignored the directions and held the can too close, sprayed too much and unevenly, and did the project when it was colder than 50 degrees, NOW YOU KNOW!

I decided to place the base of the vase (oh my gosh, that was not intentional, but I'm impressed with my rhyming abilities right now...) in the middle of a fall colored stick wreath I already had.  Totally made the whole thing.

And here it is in action, surrounded by yummy food!

Somehow my house got nominated for Thanksgiving dinner yet again (even though we did Thanksgiving AND Christmas at our house last year, how did that happen???) and I've discovered that I have somehow misplaced? Gotten rid of? Given away? Most of these handy decorations I made...

What is wrong with me???


*Be sure to check the right sidebar for all the fun parties I link to!
Related Posts Plugin for WordPress, Blogger...