


More than once I’ve had a jar of spices land on my head. How is that possible, you ask? Because I have no spice rack, and therefore keep my spices in the teeny tiny little cupboard up above the oven. You know the one. The one that’s there because having NOTHING there would look weird, but you can’t put normal cupboards there because there’s a stove in the way, so it just ends up being these ridiculous awkward cupboards where you shove the ice cream maker you got for your wedding and never used? That one. Well, THAT’S where my spices are.
I’ve lived with my spices like this for over two years. Heaven forbid we buy a spice rack. No, no, that would be too easy. I actually thought about it numerous times, but the price tag and the eaten counter space always deterred me.
So I would continue cooking with my spices above my head, beyond my 5’3” reach, allowing spice jars to rain down on my head, often falling squarely into the pasta/soup/macaroni (because let’s face it, that’s what was being made most often the past two years...) No, I couldn’t make this stuff up, you’re right.
And then I visited my wonderful best friend who currently resides in Chicago. And grew a very unbecoming shade of emerald when I saw the very magnetic spice jars I had been coveting right by her stove. I know you’ve seen them. They are just about the coolest things on earth:

Many people attach them to their fridge, but El had mounted a stainless steel magnet board to the wall closer to her stove and it looked incredible. Although makeup helped, I maintained a steady olive tone underneath it all and for months wished for and coveted the magnetic spice jars.
One day, I decided to heck with it! I’m manning up the $60 and getting the spice jars of my dreams, because with my crazy Monday Food Fests, don’t I deserve them? (If you’ve never seen a Monday Food Fest over at bugaboo, mini, mr and me, you should stop by. I’d love to introduce you to the recipes of the week...) But, before I bought them, I thought to myself, “wouldn’t it be cool if I could make them instead?”
So I held off, once again, hoping inspiration would strike. And I was feeding the baby when it did. Baby food jars.

They’re pretty much the perfect size. All they need is a little scrub, some TLC and spray paint (on the OUTSIDE, of course) and some strong magnets.
Are you the type who needs those little plastic sprinkle sifter things that come attached to your plastic spice jars from the grocery store? Me either. In fact, they annoy me because I have to take them off every time I need to really use the spice. So the fact that my new glass jars would not have holes didn’t bother me. If it doesn’t bother you either, you may want to try my super thrifty version of the $60 magnetic spice jar.
What you will need:
baby food jars
goo gone
black spray paint
silver paint pen
3/4” round magnets
E 6000
Heavy objects
The first step is to clean your baby food jars thoroughly. You’ll probably want to take the labels off BEFORE you run them through the dishwasher, thank you for discovering that little tip, mr.
Now you need to get the gunk off, because there is nothing worse than gunky spice jars. I used goo gone and I am so sold on this stuff now. It’s amazing. I sprayed it on, let it sit for a bit and wiped the jars clean with a towel. Beautiful.

Then you’ll want to clean them again, to get all the goo gone off. These will be some VERY clean spice jars.

Take your lids outside and give them a good spray with your spray paint. I had to give mine about three coats, just to make sure all the sides and words were totally covered.
Common sense, I know, but don’t spray the inside of the caps.

Lay your jars out upside down on some kind of flat, sturdy surface. Don’t ask me why I chose the living room coffee table, but I did.

Whip out your E 6000 and make sure to follow the instructions on the tube. Spread a thin layer on the jar, a thin layer on the magnet and let it sit before adhering.

The really good thing about E 6000 is that you need to let it cure just a bit before attaching the items, so it should sit anywhere from 2-10 minutes. This gives you plenty of time to smear the glue on a bunch of the jars without worrying about the glue drying too fast. I worked in batches. I would smear the glue on a bunch of jars and magnets, then start smearing the glue on some more, then go back and lay the first magnets, then smear more glue, than lay the other magnets, then smear more glue, etc. You get the idea.


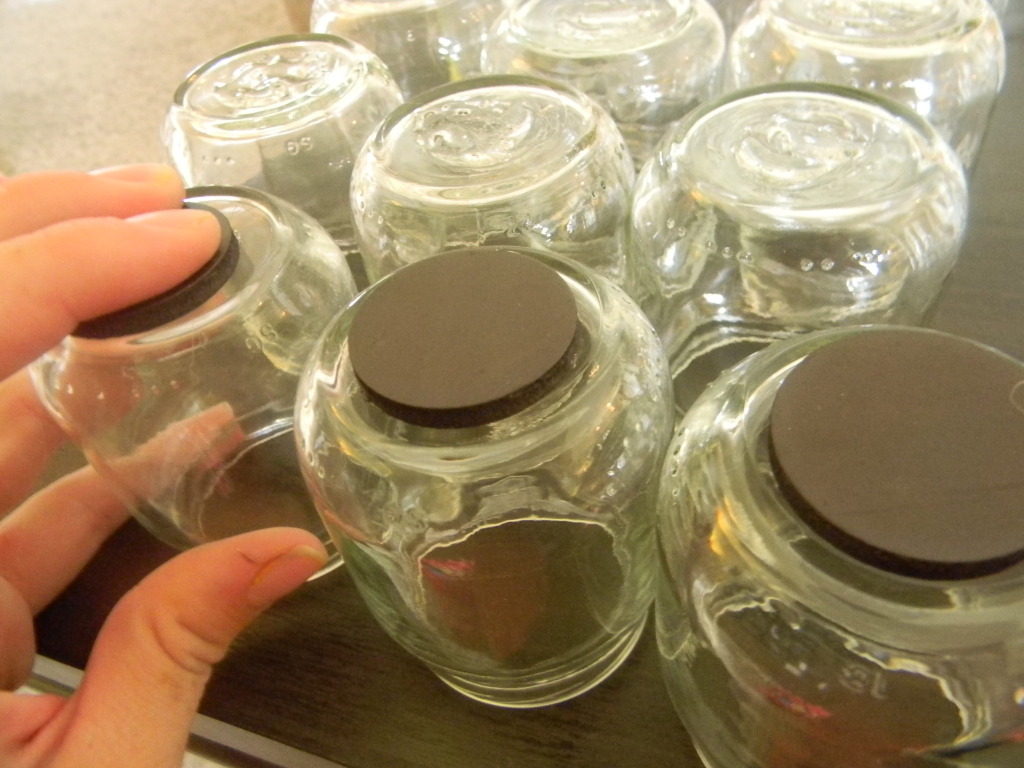


When all the magnets are on the bottom of the jars, lay something heavy, like some random closet shelving, on them. It’s also a good think we had some actual, physical encyclopedias around - thanks to mr’s salvaged childhood.

If you REALLY want to, you can get E 6000 all over your fingers on accident, like I did. But I recommend skipping that step.
Now you let them sit and cure. And wait. And wait.
They will need to cure for at least 24 hours. Right there. On the coffee table. For 24 hours. Hope you’re not expecting company or anything.
Now you can start labeling. There are lots of different ways you could do this. Chalkboard spray paint is really in right now and it might be handy to be able to change the label for when you buy new spices. But I’ve chosen to just use a silver paint pen and freehand the names. It doesn’t look super fancy, but I kind of like how it gives me ownership - these are MY spices. You know?

So, just follow the directions on the paint pen and write the names on the jars.

Once the glue is cured, your jars are all set to go.
Just put the spices in, screw on the appropriate lid (hopefully you didn’t mistake the basil for the oregano) and pop them on the side of your fridge.

(it’s true that this project involves another, less fun project, which is clearing your fridge off. But I needed to do that anyway.)

Here’re some tips:
1. My number one tip is slightly embarrassing and will help you to understand what should be my blog subtitle, which is “a chronicle of mistakes.” I redo crafts a lot. I don’t like to fail, sometimes it happens, and then my stubbornness takes charge. Soooo, when you buy your magnets, make sure they are super heavy duty. I mean INDUSTRIAL STRENGTH. The first set of magnets I bought were found online and looked perfect. They weren’t.
2. Number two goes hand in hand with number one. Ready for common sense? Test your magnet out first by gluing it to ONE glass and trying it out WITH SPICES INSIDE on the fridge. If you do not do this, you WILL be awoken in the middle of the night to the sound of crashing spice jars shattering all over the kitchen floor, which will cause a bout of depression over a failed craft and a much needed trip to the hardware store for some crazy strong magnets which you can’t do until the weekend because it is STILL SEPTEMBER and you aren’t allowed to BUY ANYTHING FOR CRAFTS! Hypothetically speaking, of course.
3. Make some extra spray painted lids. Because if you’re like me, you will not only spell well-known spices wrong, but you will also run out of space on the lid and have to cram four letters into a one letter space.
4. I have a ginormous jar of granulated garlic. (We like garlic). So I used a spaghetti sauce jar, painted the lid black and did NOT put a magnet on it, because that would look ridiculous poking off the side of my fridge. I set it on the counter next to the fridge. It matches. And it only take up this much (holds fingers super close together) counter space. Which I can handle.
5. The larger sized baby food jars (size 3 for Gerber users) are perfect for things like cinnamon sticks, bay leaves, or spices you use A LOT of.
6. The side of my fridge is only so large. Also, I only ordered so many magnets. Therefore, it obviously followed that there were some spices that would not be able to reside in the place of honor. I did NOT, however want them back in that awful cabinet (which, let’s just say it, is pretty much useless. I mean, what the heck are you supposed to use that tiny cabinet that is way too high for anyway?) I also wanted all of my spices to match. So I put my lesser used spices in jars without magnets and stowed them in the drawer right next to the fridge. I also put the larger jars in here. All of my spices are still together in one area, my lesser used spices are tucked away, and everything matches. And that dumb little cabinet has rightfully been demoted.

There you have it! Ridiculously easy, and for a fraction of the cost (about $16 for materials as compared to $60 - and WAY more jars, too). You can’t beat that. Just try.

And PS, you can vote for your very favorite Stashbusting Project on The T-Shirt Diaries, right now! Just go here - where you will find the top ten projects (which I helped pick!) and the votes are cast on the right sidebar.


7 comments:
They turned out great! It's nice to have a use for all of those empty baby food jars. I'll have to remember this idea!
I love this idea. I don't have the availibility of the jars however :( Need to find someone who wants to donate!
www.theelephantstrunk42.blogspot.com
Great minds think alike! I've been saving my baby food jars for the very same purpose! I'm so glad to see it actually looks good and works well. Now I've just got to get to work doing it!
Super fun idea!!! TFS it on Thrilling Thursday @ Paisley Passions :)
great tute! good luck with all you have going on.
gail
thanks for linking up, and linking back!
That is clever, I love how they are so handy and close by. I need some of those because I am always on the opposite side of the kitchen as my spices when cooking. Thanks for sharing with us at A Crafty Soiree! Hope you'll join us at the newest one, it begins tomorrow!
Very cute. I found exactly the same thing about a year ago on Tip Nut. They put a board behind the stove. I have also seen a metal panel put on a cupboard door.
Post a Comment