OK, first off, a little clarification. That whole “churchy tzotchke in under an hour” thing... that’s not under an hour for ALL the items, but for each different project. You probably already knew that. I mean, I’m not wonder woman. That post has been taken. BUT, here’s some more clarity, an hour is a very generous estimation in most cases. Almost all of these are more like “make three in an hour.” Or five, or ten, or whatever.
Now that that’s out of the way, I’m shedding some light on a very easy project. Ok, ok. Lame joke at best. But here is an easy way to put a little pizazz on a boring old household item.
And of course, it involves mod podge.
Before we get to the actual project, I need to fill you in on an easy little technique that I took advantage of for a number of these projects. It’s the same technique I used on the antiqued photo tile I made for dad IL.
Let’s say you want to transfer an image or words to an item, but you don’t have the moola for vinyl. Let’s say you want said item to have a layered look. And let’s assume for the sake of the following projects that you aren’t exactly 100% certain at the outset just how each item is going to look. (preplanning is not my forte, we all know that).
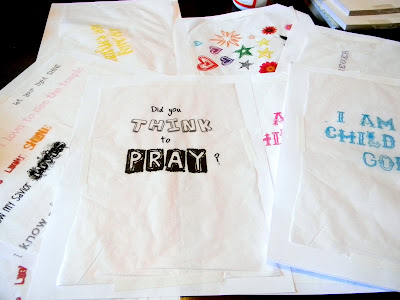
Start by making your image on the computer. You could use any program, really, but I generally use picnik. It can be words, phrases, pictures, whatever.
Now, cute some tissue paper to just shy of computer paper size.
Use some not very sticky tape to adhere the tissue paper to some computer paper(I used this white-out tape stuff because it isn’t very adhesive so nothing will tear when un-taping)(and who uses white-out anymore, anyway? I have to use it for SOMETHING). Make the tissue paper as flat as possible.
Run it through your printer as you would normally, printing your image onto the tissue paper.
When you are finished, you have an image that you can mod podge on to just about anything with a white background that will turn translucent on some papers or effectively transparent on most light colored backgrounds. Easier than writing or drawing everything, cheaper than vinyl.
On to project 1:
I picked up three different flashlights at the dollar store, mostly because I wanted to give the boys something more than necklaces and bracelets to choose from. (funnily enough, two of the flashlights were purchased by GIRLS. Hm. Am I sexist?)
Measured and cut some scrap book paper to fit around the base of the flashlight and reach from bottom to just under the on/off switch.
Podged the flashlight.
Stuck the paper around and smoothed it out REALLY WELL.
Cut around each tissue paper word I wanted to use.
Mod podged the scrapbook paper where I wanted the words to be.
Lightly, very very lightly, tapped the tissue paper words down. (you have to have a gentle touch. A NOT gentle touch will a) rip the paper or b) smear the ink.) (Yes, I did both a and b.)
Let it dry.
That’s it!
You can also podge the tissue paper right to the flashlight, like this one,
or do this to a booklight:
And three primary kids now have a jazzed up reminder to always be an example of the believers!


4 comments:
This is such a cute project:) I am now following you thanks to Wandering Wednesday, and it would be nice if you could share the love back on my blog;) Also don't forget, if you need any help increasing your blog's traffic or easy blog tutorials, you know where to come!
Today we have some brand new tips to better our blogs, so make sure you don't miss that! Happy Thursday!
You were featured on my blog!! Swing by and grab the 'feature' button- I have a link up as well if you'd like to join. :) Have a great Thursday!
Jennifer @ Life with the Lebedas
www.lebedafamily.blogspot.com
that tissue paper mod-podge technique is the best! i use it on little items like buttons and knobs. the decorated flash lights are very very cute!
The tissue paper mod-podge idea is wonderful! I'm newly obsessed with mod-podge and this is such a wonderfully easy, beautiful technique that I never would have thought of!
Post a Comment